Monday, May 13, 2013

On to the next one!

I have to admit, after the whole loss-of-pictures debacle, I was definitely feeling down in the baking area. A lot of work had been lost on here and I didn't feel like baking anything. Not a single thing. Sad, huh? But one day, my boss at work randomly says to me, "We should have a baking contest!" to which I replied like a 13 year old girl, "OH-EM-GEEEE! YES WE SHOULD!!!!" This shot a wave of excitement through me because I had a reason to get started again and bake something new. I mean, I'm known as the "baking girl" at work anyway, how could I not bake something??

It took me a long time to come up with what I was going to bake. Obviously, I was gonna make cupcakes, but which ones? I'd already done standard vanilla and chocolate. It was time to do something completely different. Thus, the Pinterest inspired idea for three musketeer cupcakes sprang to life!! If you ask any of my close friends, though it may take them a second because I have so many sweets that I love, they'll tell you that three musketeer bars are my all time fav. I always have and always will love them. So, why not stuff and top a chocolate cupcake with what I consider to be the best candy bar ever? Sounds good to me!!

So, here they are in all of their glorious wonder:


As I said before, these were from Pinterest and this is the link that I used: 3 Musketeers Cupcakes. I really enjoyed this recipe a lot. It was easy and came out deliciously! It was definitely the most moist, light and fluffy cupcake I've ever made. I was super excited! I did make some tweeks to the recipe, but unfortunately, I don't remember what they were. Baking Tip #16: Always write down any modifications you make to the recipes. Not only does it make the cake/cupcake/cookie a little bit more of your own, but if it turns out really amazing, you know exactly what you did to make them that way.

The thing I was probably most excited about with this recipe was the frosting. I mean, melted three musketeer bars whipped into a frosting? Pure heaven. I had never worked with marshmallow fluff before, but I figured it wouldn't be that difficult. It actually ended up being the easiest part of making the frosting since I had to melt down the candy bars, which didn't go that smoothly. It started out easy enough, the first batch was damn near perfect but I can't say the same about the second. Baking Tip #17: When melting those mini candy bars, give it your undivided attention. Seriously. You'll burn something just like I did! One minute I was melting the candy bars and the next, while I was pulling the cupcakes out of the oven, the pot was smoking!! Don't worry, neither my pot nor myself were damaged but it was still scary, not to mention smelly. Burnt chocolate (or anything burnt for that matter) does NOT smell good. So, be sure to melt your chocolate when you have the time to stand by and mix it constantly to avoid any burning!


Once my candy bars were melted, I mixed them in with the other ingredients and ended up with a very yummy frosting. It wasn't as fluffy as the recipe's pictures showed, or as dark, but it still held together with that cute little peak on top of the cupcakes which is all I care about! Well, that and the fact that it was soooo good! I think when I make them again, though, I will melt the candy bars for a little bit longer. The frosting had bits of chocolate that I guess didn't melt down all the way which didn't alter the taste at all, it just didn't look as pretty as it could have.

OH! and I can't forget the little treasure in the middle of the cupcakes. Such a brilliant idea! Of course I want a mini candy bar in the middle of my delicious chocolate cupcake. Who wouldn't?? This was the easiest part of the cupcake making process because you just baked them for a few minutes, dropped the piece of chocolate in the middle and TA-DA!! instant yummy filling.


 Top: After having them in the oven for about 5 minutes, push the candy bar 
into the middle of the cupcakes.
Bottom: This is what they look like after. I probably should have pushed them in farther 
before they were done baking.  Oh well!


So, I'll leave you with that! Seriously, make these cupcakes, they were truly amazing! Or try making them with one of your own favorite candy bars. Milky Way? I'd totally be down for those.

Until later,
Baker in Training

Want a bite?? :-P
Saturday, March 30, 2013

The saddest day in blog history...

I guess not in all of blog history, but definitely in MY blog history. I apparently suck at life because I thought that once my pictures were on the blog, they would stay there. Boy, was I wrong. I was able to recover a few, but it wasn't even worth putting them back in at this point! I was also foolish to think that since they'd be on my blog forever, that I wouldn't need to keep them on my phone or on the computer anywhere. Not even an iCloud or iTunes back up. I was basically asking for this to happen. I guess I just have to suck it up and get over it!

It's in the past now. I have to move on, start fresh and continue to post more baking adventures!! Sorry to those who are looking at this blog for the first time right now, there won't be much beyond this point. I promise that it was a blog full of fun things and pictures. Hopefully the tips are still a little helpful. :(:(:(:(:(

Until later,
A Very Sad Baker in Training

Thursday, March 28, 2013

And what does she win? A BRAND NEW KITCHEN!

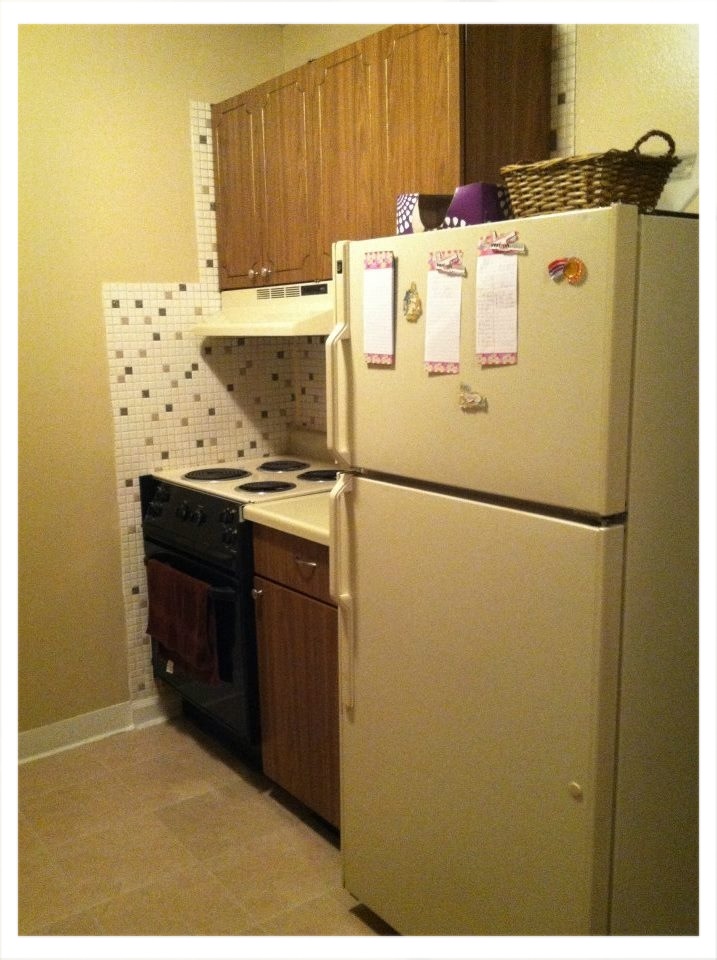
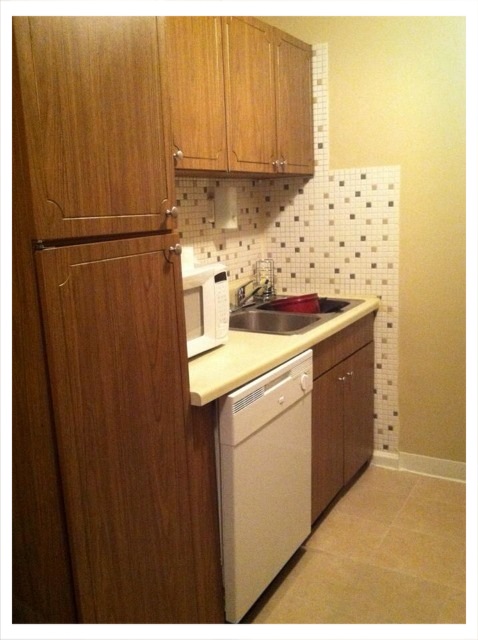
...Well, I didn't win it per say, but my apartment complex decided to remodel and gave me a new kitchen. That's a win in my book!! It definitely wasn't for free, mind you, our rent is definitely going up but at least only by a little. Either way, I HAVE A BRAND NEW KITCHEN!!!! Can you tell I'm excited? I so am.

Now, I wasn't completely unsatisfied with the old one. It had a working (old) oven and a sort-of working disposal (clogged often) and refrigerator (leaked frequently). But, it was my kitchen and I loved it. I did not know, however, how much I would love a new kitchen with new appliances. I almost teared up I was so happy to be working with new things in the kitchen. I thought for sure I'd have to wait until I was in my permanent house in order to have new things but I stand corrected. So anyway, here is the before [top] and after [bottom] of my kitchen transformation. I just love it!


The day after the final remodel, it took them several annoying-couldn't-have-anything-in-the-cabinets-or-on-the-counter-tops days, I decided I wanted to bake something. I just HAD to break in that new oven!! I broke out my baking tools and set out to make brownies for the first time. Yes, my very first time baking brownies from scratch. [You thought I'd never get away from cupcakes, did ya?? :-P]

Well, let's just say (how many times have I said this?) the brownies didn't turn out as well as I'd hoped. I used this recipe from Pinterest Lunch Lady Brownies and it seemed like a solid one to me. *...Says the novice brownie baker...* But it most certainly was not or I just mixed it wrong or something. I honestly do not have any idea. This is what I ended up with:


Baking tip #14: Don't put your frosting on when the brownies are even the slightest bit warm. I thought to myself, "Sure, Self, these are cool enough that your frosting won't melt, separate and leave a weird sugar/butter mess on top of your cardboard brownies." I was WRONG. Cool completely. You'll thank me later.

Baking tip #15: Do some research with your recipes. Compare several different ones and see the commonalities and differences. Don't just pick one and assume it's going to be the best recipe ever, I learned that the hard way. Some recipes are better/worse than others. Let me just say I won't be using this recipe again... we just didn't mesh too well.

I couldn't even eat a whole slice of it. Ryan ate one, but I think it was just to humor me. What a sweetheart! If he had baked them, I would've told him, "Um...this tastes like weird chocolate cardboard. Can I puke it up now?" Not really, because I'm not that mean, but that's what I would've at least said in my head! They must have been missing something or maybe I messed the steps up? Eh, I dunno. Either way, I threw them out! See ya later weird brownies!!

After that brownie debacle, I decided to retire brownies for now and start with something a little more simple. I started looking on Pinterest for a solid chocolate chip cookie (CCC) recipe and Boy! did I find one!!! 8 Secrects to the Perfect Chocolate Chip Cookie:  I love this link because the author goes into the most amazing detail about do's and don't's of baking CCCs. She has a step-by-step guide to mixing and even has a troubleshooting section. Who would've thought of "cookie troubleshooting?" I'd never seen it before but this author really gives good pointers. It's too awesome!! I can say that after following those steps, I was much more confident in my cookies that I was in my brownies. They even tasted delicious, too!!!! So, without further ado, here they are:


 LOOK AT THAT SHINY, CLEAN, NEW OVEN!!! :):):)

Perfect, right? Well... close enough for me! I hope everyone has a great Easter weekend. Maybe I'll bake something Easter-y?

Until later,
Baker in Training

Thursday, March 7, 2013

DOUGHNUTS!!!!! or DONUTS??

Do I have your attention now?? No matter the spelling, (for my own purposes, I choose "doughnuts"), those rings of heaven are truly amazing. Now, I will preface this post with this simple fact: fried doughnuts, or however Krispy Kreme makes them, are the best ever. However, since I do not own a deep frier and would honestly never want one, I decided to try baking my doughnuts.

It all started with a trip to Goodwill. I was killing some time, waiting for a coworker to get off of work when I stopped by the thrift store. I perused the isles, not expecting to find anything, when BAM! I see these pans:


How adorable are those? Never in my life would I expect to find doughnut pans at Goodwill. Needless to say, along with a Unicorn painting, I purchased the $2.00 pans and went on my merry way. That evening, as I was waiting for Ryan to get home, I thought to myself, "What the hell, I want to make doughnuts!!" So, I scrubbed the pans and went to work. I found this recipe (thanks again, Pinterest) Mini Baked Donuts and started mixing.

I'll just cut to the chase and say that my doughnuts didn't turn out that wonderful. I'll just show you what I mean...


Baking Tip #12: As you can see, I overfilled the circles. Try to only fill them about a third of the way full. I just used a gallon zip lock bag and cut the tip off of it and piped the dough into the pans. Little did I know that some would be filled way too much and look like weird little mushrooms instead of doughnuts. See? ---->

Anyway, I then moved onto the glaze/icing. It was very simple but it was way too sweet! I'm not quite sure how doughnut makers get the glaze to be sweet but not "hurt your teeth" sweet. Ya know what I mean? I added sprinkles just for looks because they definitely didn't help the sweet factor. Also, the glaze was very thin so, Baking Tip #13: Double dip the glaze (if you like the taste of it) to get that thick, pretty looking glaze that the professionals always have. Let the first layer dry for just a little bit and then go in for the second! Well... do that before you add your toppings, of course! :):)


So my doughnuts looked okay, but they didn't taste very good. They were as hard as hockey pucks within the hour (don't ask me why, I have no clue). But!! Never fear! Not all was lost because I decided to bake something completely different. My best friend in the universe [BFITU] and her fiance sent a mason jar cookie mix to us for Christmas. Yeah, I hadn't baked them until now... No judging! They were juuust fine!! So, since my doughnuts were a bust, I mixed together these little babies and they were delicious! Here they are:


They were wonderful and my guests (interviewees for the grad program that Ryan's in) enjoyed them as well. Thanks, Steph and Keith! Hopefully my next batch of doughnuts goes better than this one, but at least I had a backup plan.

Until later,
Baker in Training

PS. I'm in the market for a good-but-not-a-million-dollar digital camera if y'all have any suggestions! Thanks!

Saturday, February 16, 2013

Baking With Love

I know a lot of people who hate Valentine's Day (yeah, yeah I know, it's been over for a bit, but still) and I've never quite understood why. Is it because you're single on Vday? Well, I've been single on several Vdays and I still enjoyed them (though maybe not as much as the day after when I would buy a shopping cart full of 50% off chocolates). You have TONS of things to love on Vday if you don't have a boyfriend/girlfriend. You love your family, right? You love your friends, right? You love your animals, right? See where I'm going here?  Is it because you've never gotten anything for Valentines day? Ryan and I didn't even celebrate it that day. I didn't get flowers or chocolates or a teddy bear and I'm still okay. Granted, he did take me to dinner for a 'belated' celebration that weekend but that's beside the point. I still enjoyed the 14th very much. I think Vday is a great holiday... even if it was made up by Hallmark for more money.  Blah, blah ...and that's the end of my rant!! :):)

Anyway, what I love most about Vday is the sweets. Shocker, right? The night before I baked cupcakes (yes, again- the same ones in my other posts but just added cocoa powder to them) to take to work on Vday to show all of my co-workers how much I luuurve them! I have to say, they were a succes. I wanted to tackle chocolate cupcakes for the first time AND wanted to make a great buttercream. I still can't believe it's taken me so long to get that right, which brings me to this: the best buttercream I've ever made... TA DA!


I used this recipe Fluffy Buttercream Frosting and changed it just a tiiiny bit. I added about two teaspoons of shortening and about half a cup less of powdered sugar. I was jumping up and down with excitement when I was done with this frosting. I kept yelling, "RYAN, RYAN! COME LOOK!!! IT'S SO AMAZING!!" The recipe I used was such a great one. The writer gives a few tips/tricks that worked perfectly. Baking Tip #10: Follow every tip that recipe includes, I couldn't believe how much of a difference those little things made. I found in the making of my frosting that beating the butter/shortening for 7-8 minutes was very important. It was white when I was finished beating it and I truly think that's what helped in the making of it, not to mention I used actual, real butter this time! :-D

Something else I tried was a Pinterest find: Cookie Dough Frosting. Sounds amazing, right? I surely thought so!! However, mine didn't turn out anywhere CLOSE to the one on that website. When I was mixing it, it started to look great but then I asked myself, "How is this going to come out of the piping bag? It's too thick!" So I added more milk. I guess I added too much because I got this:


Uhhhh... Not cute. I dumped it back into my mixing bowl and put more flour/powdered sugar in it. It helped a little bit but they still turned out weird/runny.


Maybe I'll save that for another time. I think I might try to make it by itself as a sweet dip or just something for me to eat by the gallon with my hands...?

Another thing I was super excited about was the decorations on my cupcakes. I wanted to make little red fondant roses but after baking/mixing for 3 hours I was ready for something a little quicker. So, I tried an experiment. I had mini chocolate chips for the topping of the cookie dough "frosting" I made and I figured they melted just fine, won't they work if I pipe out some cute heart designs? Nope!!! Baking Tip #11: They're more expensive and they're definitely more work but you should really buy candy melts. I wanted those chocolate chips to work SO badly but it wasn't in the cards. The candy melts harden very nicely and hold their shape whereas my chocolate drawings started to melt as soon as I took them out of the freezer. They weren't hard enough sitting out on their own so I put them in the freezer. I don't even know if THAT was a good idea. Haha! My designs turned out okaaay but they just didn't hold as well as I would've wanted them to. Next time, I'm definitely going for the candy melts.


Well, I hope everyone had a good Valentine's day and got to spent lots of time with your loved ones!

Until later,
Baker in Training


And here I leave you with my last amazing thing: MY CUPCAKE LINERS DIDN'T STICK TO THE CUPCAKES!!! How? I have no clue. I didn't put any oil in this batter, is that it? Everything I know from experience would point towards oil being the reason they wouldn't stick, not that they would stick. Right? Uhhh... I'll just practice more and find out! See ya!!

Sunday, January 20, 2013

Cake Pops- Round 1

The other day, my friend and I decided to try to make cake pops. When someone describes them, don't they seem easy?

1. Make round balls.
2. Shove stick in.
3. Submerge in candy melts.
4. Voila! Beautiful cake pop.
............Wrong. 

Let me tell ya, they weren't as easy as I thought they were going to be. Don't let those pics up top there deceive you. Out of about 25 balls, we only got a few cute ones. I even prepped by watching tons of YouTube videos and reading recipes before making them. Well, they didn't help with these. I want to specifically reference this blog post Cake Pops Are Not Easy because she describes how the first attempt at making cake pops doesn't go as well as one may hope. Our results were the same to the T. For example: the pops falling off the sticks and into the candy melts, producing a "crumby" candy coating that wasn't cute at all. Not to mention the sprinkles we accidentally got in it. Note to self: don't decorate over your bowl of candy melts... That is if you can even get the melts to a good consistency in the first place.

So, here are some of the pics from our trial and error cake pop baking:

L: Look at that adooorable packaging for the sticks!
R: Easy (cheap) way to take pops on the go- solo cup! 

L: Heart molds! Cute but waaay too heavy for dipping 
and not wide enough to put the stick in very well.
R: Pink=cake pop maker (weird UFO shapes), Yellow=hand molded.

Baking Tip #8: So many things went wrong while we were making these. The biggest being that the balls (hey! get your mind outta the gutter!) kept falling off the sticks. Now, we did do one thing right in that we coated the tip of the stick before shoving it into the bottom of the ball. Though, make sure you don't dip all of the sticks in one color and then try to cover it with other colors, it doesn't work. Trust me. I don't know if it was because some of the balls were too small or we didn't let them sit long enough to harden or we didn't use enough candy melt on the end of the stick. It was probably a combo of all. Either way, most of our cake pops were lopsided because they started to come off of the stick (or completely did, thus creating the "crumby candy melts") or the coating was too heavy for them. We did make them two ways, a cake pop maker (the pink balls) and the cake crumbles + frosting (the yellow balls). I think the cake pop maker didn't make them as solid inside and a little small so they didn't hold the candy melts as well and the other balls did. Though, neither were perfect.

Baking Tip #9: Another (among many) problem was that our candy melts just weren't working for us. First of all, the bowl we melted them in wasn't deep enough to dip the cake ball in. So, make sure you use a deep enough bowl that allows you to dip the entire ball into it. That way, you can submerge the pop and rock it back and forth in the melts to coat the whole thing (don't swirl it around, that's what makes it fall off). Once we switched to a deeper bowl, we were able to dip the whole thing in, but when it came to getting the excess liquid off, that didn't work either. I think we never got the melts hot enough so it wasn't thin enough to drip off and hardened really quickly. I've seen it done two ways: microwave and double boiler. I tried the microwave and it was okay, but next time I'm going to try the double boiler. What's there to lose in trying a different approach? Nothing!!

It was still A LOT of fun [and work] making the pops. Everyone at work loved them even if they weren't the most beautiful things ever. I can't wait to attempt Round 2!! They'll be better then, right??? Oh, and one last quick question, how do you devour your cake pop?
Until later,
Baker in Training

Thursday, January 10, 2013

My Resolution: Bake More!

Though my real resolution is to eat more cupcakes get abs, I don't quite know how realistic that is. So, I want to bake more (and Ryan interjects- cook more!). I think this is more achievable, not to mention is the opposite of getting abs, because it requires zero physical effort, unless you count the arm pain that follows holding an electric mixer up for five minutes straight trying to get a fluffy icing. I've baked a good amount, but not quite enough. I've mainly been focusing on cupcakes/frosting, but hopefully I can branch out to others, i.e. cake pops, decorated cookies, fondant creations, etc.

I started out the first of the year with, brace yourself, a STIFFish FROSTING!!!!!!!!!!!!!!!!!!!!!!!!!! Talk about a good sign. Here it is:


As you can see, it's still not the amazing fluffy stuff you see at professional baking places. I'm most envious of those who compete on Cupcake Wars. They make it perfect everytime! I brought these beautiful cupcakes to work and of course I was berated because, "Bleighton!!! We're all on diets!". To which I replied, "Don't worry, they're calorie and sugar free.... ;)". Yeah right, I wish. They still ate them, though. Including myself with no abs and all.

I used the same recipe I've been using this whole time, I just added more and more powdered sugar. I think the recipe called for 4 cups... I put 8. I was crossing my fingers, hoping it wasn't going to give me a toothache from being too sweet. But, to my surprise, it wasn't! The other change I made this time was adding heavy cream. Milk is much too runny and even though I didn't add any to the second batch that was still not stiff, it didn't turn out the way I wanted. So, adding the heavy whipping cream made a HUGE difference. Next time, since I finally bought it, I'm going to use crisco. Some people have told me that they use both crisco and butter, so I'm going to try it.

Now, this one may shock you, but I just realized that I'm not using butter when I make my frosting. Sure, I'm using something that looks like butter, tastes like butter, smells like butter, but truly isn't butter. That could be THE biggest reason why my frosting has been lacking in fluffiness. Unless someone can enlighten me and let me know that it's just fine to use it!!! We've always had the tub-o-butter [margarine] in our fridge.


Not once in my life have I not called it butter or used it when recipes called for butter. Though, we do buy the butter sticks in the summer for corn on the cob, duh! Deep down I knew it wasn't "real" butter, but I used it anyway because it had become habit to use.

Thus, I come to my point- Baking Tip #7: "For baking and cooking: Butter is the best for baking, because its high fat content (80% fat) yields the best results, such as tenderness and flakiness. Whipped butter or butter-oil spreads will not give you the same results as butter, so do not use them in your baking -- though they may be fine for most cooking." (Article Here) Double check your ingredients. This may sound dumb, sometimes I am, but make sure you have what the recipe calls for. The fact that I haven't had been able to make a fluffy, delicious frosting could be because I've been using this imposter butter. Now, I like margarine so I will continue to use it when cooking and maybe in some cake mixes, but after I try it with my frosting next time and it turns out perfect, I probably won't use it ever again to make it.

What's your New Year Resolution? Are you still sticking with it?

(I am!)

Until later,
Baker in Training